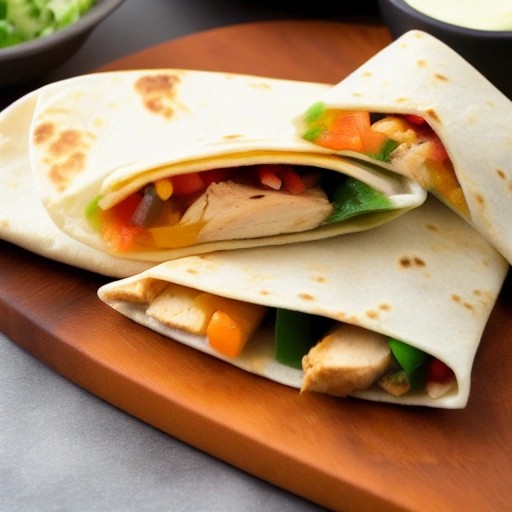
Easy Tex-Mex Chicken Quesadilla Crispy Wrap: A Smoky RV Grill Favorite
There’s nothing quite like the sound of a crispy quesadilla sizzling on the grill, with melted cheese oozing out and that irresistible smoky flavor infusing every bite. This Easy Tex-Mex Chicken Quesadilla Crispy Wrap is the ultimate road trip meal that brings the bold flavors of the Southwest to your motorhome kitchen. Whether you’re parked at a scenic overlook or settled into a cozy campground, this recipe delivers that authentic BBQ recipe feel with minimal effort and maximum taste.
This crowd-pleasing dish is perfect for hungry travelers who want a quick, satisfying meal without sacrificing quality. It’s an excellent way to use up leftover grilled chicken while making the most of your RV refrigerator space and food storage. The beauty of this recipe is its versatility—you can fire up your gas grill or charcoal grill and achieve that delicious smoky flavor that takes a simple quesadilla to the next level. Plus, it’s budget-friendly, making it a smart choice for families watching their meal costs on the road.
Why This Easy Tex-Mex Chicken Quesadilla Crispy Wrap Works
This recipe is all about smart, efficient RV cooking. It transforms simple ingredients into a restaurant-quality meal that feels like a treat. Perfect for using up leftovers and minimizing food costs, this dish is a testament to clever meal planning. It’s also a great way to practice smart fridge planning and make the most of your camper fridge capacity, ensuring you have space for other essentials on your trip.
Recipe Card
Recipe Summary
Prep Time: 10 mins
Cook Time: 12 mins
Total Time: 22 mins
Servings: 2-3
Difficulty: Easy
Ingredients
- 2 large flour tortillas (burrito size)
- 1½ cups cooked chicken breast, shredded or diced (grilled chicken works best)
- 1 cup shredded Mexican cheese blend or cheddar
- ½ cup canned black beans, drained and rinsed
- ¼ cup corn kernels (canned or frozen)
- 2 tablespoons diced green chilies (canned)
- 1 teaspoon chili powder
- ½ teaspoon cumin
- ¼ teaspoon garlic powder
- Salt and pepper to taste
- Olive oil or cooking spray for grilling
- Optional: sour cream, salsa, and guacamole for serving
Instructions (Step-by-Step)
- Preheat Your Grill: Preheat your gas grill to medium heat (about 375°F). For a charcoal grill, set up a two-zone fire with hot coals on one side and a cooler zone on the other. This gives you control over how crispy your quesadilla gets without burning the tortilla. If you’re after that authentic smoky flavor, a charcoal grill will deliver beautifully.
- Prepare the Filling: In a medium bowl, combine the cooked chicken, black beans, corn, green chilies, chili powder, cumin, garlic powder, salt, and pepper. Mix everything well. This filling is packed with Tex-Mex flavor and is a great way to use up leftover grilled chicken from a previous BBQ recipe.
- Assemble the Quesadilla: Lay one tortilla flat on a cutting board. Sprinkle half the cheese evenly over the entire tortilla. Spread the chicken mixture over half of the tortilla. Top with the remaining cheese. Fold the empty half of the tortilla over the filling, pressing down gently to seal. Repeat with the second tortilla.
- Brush with Oil: Lightly brush both sides of each quesadilla with olive oil or spray with cooking spray. This will help achieve that golden, crispy texture on the grill.
- Grill the Quesadilla: Place the quesadillas on the preheated grill over direct heat. Cook for 4-5 minutes per side, or until golden brown and crispy with beautiful grill marks. Flip carefully using a large spatula. The cheese should be melted and the tortilla should be crunchy and smoky.
- Rest and Serve: Remove from the grill and let rest for 2 minutes. This helps the cheese set slightly. Cut each quesadilla into wedges and serve hot with sour cream, salsa, and guacamole. Enjoy that crispy, smoky BBQ flavor!
Tips for the Perfect Crispy Quesadilla
- Getting Perfect Grill Marks: Make sure your grill grates are clean and well-oiled before adding the quesadillas. Place them at a slight angle on the grates, cook for 2 minutes, then rotate them 45 degrees without flipping. This creates those classic crosshatch grill marks that look amazing.
- Controlling Heat Zones: If your tortillas are browning too quickly while the cheese isn’t melting, move them to the cooler side of your grill (indirect heat) to finish cooking. This is especially important when using a charcoal grill.
- Avoiding Soggy Quesadillas: Don’t overstuff your quesadilla. Too much filling can make it difficult to flip and can lead to a soggy center. Stick to the recommended amounts for the perfect crunch.
- Prevent Sticking: If you’re worried about sticking, you can cook the quesadillas on a piece of aluminum foil on the grill. Just be sure to poke a few holes in the foil to allow some smoky flavor to penetrate.
Variations
- Spicy Chipotle Quesadilla: Add 1-2 tablespoons of adobo sauce from a can of chipotle peppers to the chicken mixture. This adds a deep, smoky heat that’s incredible.
- BBQ Chicken Quesadilla: Swap the chili powder and cumin for 2 tablespoons of your favorite BBQ sauce. This gives the quesadilla a sweet and tangy flavor reminiscent of a BBQ recipe classic.
- Veggie Quesadilla: Skip the chicken and load up with sautéed bell peppers, onions, mushrooms, and zucchini. The grill adds amazing smoky flavor to the vegetables.
- Breakfast Quesadilla: Add scrambled eggs and crumbled bacon to the filling. This is a perfect hearty breakfast or brunch option for camping mornings.
- Healthy Quesadilla: Use whole wheat tortillas, reduce the cheese by half, and add plenty of fresh spinach or kale. Serve with a side of fresh salsa instead of sour cream.
Storage Instructions
- How to Store Leftovers: Allow any leftover quesadillas to cool completely. Wrap them individually in foil or place them in an airtight container. Store in your RV refrigerator for up to 2 days.
- How to Reheat Without Drying It Out: The best way to reheat these quesadillas is on the grill or in a dry skillet over medium heat. This restores the crispiness and brings back that smoky flavor. If using a microwave, they will become soft, so we recommend reheating for 2-3 minutes on a grill or skillet over medium-low heat, flipping once.
Frequently Asked Questions (FAQ)
Q: Can I use raw chicken instead of cooked chicken?
A: Yes, but you’ll need to cook the chicken first. You can grill chicken breasts or thighs directly on your gas or charcoal grill, seasoned with the same spices. Once cooked through, let it rest, chop it up, and then follow the recipe as written. This is a great way to combine two grilling steps into one BBQ session.
Q: Can I make these quesadillas on a stovetop if I don’t have a grill?
A: Absolutely! A cast-iron skillet or non-stick pan over medium heat works wonderfully. You won’t get the same smoky flavor as a charcoal grill, but you can still achieve a beautifully crispy exterior. To mimic grilling, try using a grill pan with ridges.
Q: How do I manage my RV fridge space with this recipe?
A: This recipe is excellent for fridge space management. Keep cheese, sour cream, and salsa in your RV refrigerator. The chicken can be pre-cooked and stored, while beans, corn, and chilies are shelf-stable and perfect for pantry storage. This smart approach to fridge planning ensures you maximize your limited fridge capacity.
Q: What’s the best way to get a smoky flavor on a gas grill?
A: While gas grills don’t naturally produce smoke like charcoal, you can add a smoker box filled with wood chips (mesquite or hickory work great) to your gas grill. Place it on the grates and let it smoke for a few minutes before adding the quesadillas. This infuses them with that delicious, authentic smoky taste.
Q: Can I freeze these quesadillas for later?
A: Yes, they freeze very well! Allow the cooked quesadillas to cool completely, wrap them individually in plastic wrap, then in foil, and place them in a freezer bag. They’ll keep for up to 3 months. To reheat, grill directly from frozen on medium heat for 8-10 minutes per side, or until heated through and crispy.