Quick RV Chicken Caesar Salad Wrap: The Ultimate Fresh, No-Cook Lunch
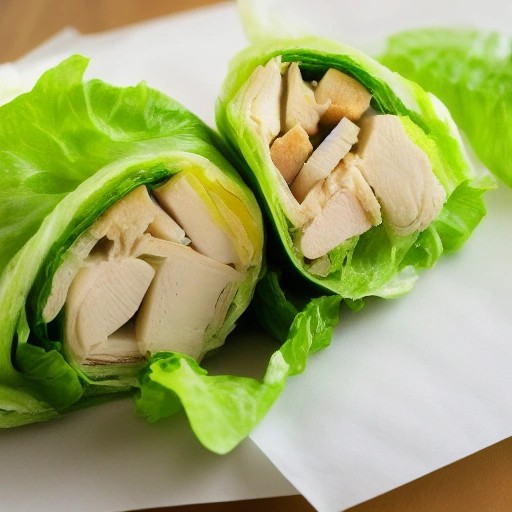
Imagine a cool, crisp, and creamy chicken Caesar salad wrapped in a soft tortilla—the perfect no-fuss lunch that’s ready when you are and travels beautifully in your RV cooler. This Quick RV Chicken Caesar Salad Wrap is the ultimate fresh meal for life on the road, combining the classic flavors of a Caesar salad with the portability of a wrap. It’s the kind of lunch that feels like dining out, even when you’re parked at a roadside rest area.
Chicken Caesar wraps are a fantastic choice for RV cooking and camp meals because they come together in minutes, require no cooking (if you use pre-cooked chicken), and travel well in your RV fridge or cooler space. They’re also a smart choice for your food budget and trip budget, using simple, affordable ingredients that maximize your fridge capacity and minimize food waste. This is exactly the kind of camping food that makes life on the road easier and more delicious.Why This Chicken Caesar Wrap Is Perfect for the Road
- No cooking required – Perfect for hot days or when you want to save camping propane and water
- Ready in minutes – Quick assembly with minimal cleanup
- Customizable – Endless variations to suit your taste
- Portable – Easy to wrap and eat on the go
- Great for leftovers – Use leftover grilled chicken from a previous BBQ recipe for added smoky flavor
Recipe Card
Recipe Summary
Prep Time: 10 mins
Cook Time: 0 mins
Total Time: 10 mins
Servings: 4
Difficulty: Easy
Ingredients
- For the Wrap:
- 4 large flour tortillas (or whole wheat, spinach, or gluten-free)
- For the Filling:
- 3 cups chopped romaine lettuce
- 2 cups cooked chicken, shredded or diced (use leftover grilled chicken, rotisserie, or pre-cooked)
- ½ cup Caesar dressing (store-bought or homemade)
- ¼ cup grated Parmesan cheese
- Optional Add-ins:
- ½ cup croutons (pack separately to stay crisp)
- 1 avocado, sliced
- ½ cup cherry tomatoes, halved
- Cooked bacon, crumbled
Step-by-Step Instructions
- Combine the filling. In a large bowl, toss the chopped romaine, shredded chicken, and Parmesan cheese with the Caesar dressing until evenly coated .
- Warm the tortillas (optional). If you have access to a stovetop or camp stove, warm the tortillas in a dry skillet for 15-20 seconds per side to make them pliable and prevent tearing .
- Assemble the wraps. Lay a warm tortilla flat. Spoon a generous portion of the chicken Caesar mixture down the center . Add any optional toppings like sliced avocado, tomato, or crumbled bacon .
- Wrap it up. Fold in the sides of the tortilla over the filling, then roll it tightly from the bottom up to form a secure wrap .
- Toast (optional). For a warm, crispy exterior, place the wraps seam-side down in a hot skillet for 1-2 minutes per side until golden brown .
- Wrap and go. For road trip travel, wrap each burrito tightly in foil or parchment paper. Keep extra dressing and croutons separate until ready to eat to prevent sogginess .
Pro Tips for the Perfect RV Chicken Caesar Wrap
- Prep ahead for zero cooking. At home, shred the chicken, make or buy dressing, and chop the lettuce. Store everything separately in your cooler space or RV fridge .
- Prevent sogginess. The biggest challenge with Caesar wraps on the road is keeping the lettuce crisp. The secret is to keep the dressing separate until you’re ready to eat . Store croutons separately too .
- Use leftover grilled chicken. This is a fantastic way to repurpose leftover grilled chicken from a previous BBQ recipe. The smoky flavor adds a delicious twist.
- Pack smart. Pre-portion your wraps and store them in a dedicated cooler compartment for easy access on travel days. Use stackable containers to maximize your fridge capacity and keep your fridge organized .
Variations
Classic Chicken Caesar Wrap
- Use classic Caesar dressing and add croutons for crunch
- Top with freshly cracked black pepper and extra Parmesan
Bacon Chicken Caesar Wrap
- Add crispy crumbled bacon for extra savory flavor
- The smoky flavor from the bacon pairs beautifully with the Caesar dressing
Avocado Chicken Caesar Wrap
- Add sliced avocado for creaminess
- Use avocado in place of some of the dressing for a lighter option
Spicy Chicken Caesar Wrap
- Add a pinch of red pepper flakes or a few dashes of hot sauce to the dressing
- Use pepper jack cheese instead of Parmesan
Use leftover grilled chicken
- This recipe is designed to repurpose leftover grilled chicken from a previous BBQ recipe. The smoky flavor adds a delicious twist.
Storage Instructions
Storage: Store prepped ingredients separately in airtight containers in your RV fridge for 3-4 days . Assembled wraps can be wrapped tightly in foil and stored for 1-2 days, but are best eaten fresh .
Reheating: This is a no-cook meal, but you can toast an assembled wrap in a dry skillet for a minute or two if you prefer a warm, crispy option.
Frequently Asked Questions (FAQ)
Can I make these chicken Caesar wraps ahead of time?
Yes! The best way is to prep all the components separately and assemble just before eating. This keeps the lettuce crisp and prevents sogginess .
What’s the best tortilla to use?
Large burrito-sized flour tortillas (10 inches) are ideal because they’re flexible and easy to roll without tearing .
Can I use leftover grilled chicken in this recipe?
Absolutely! This is a fantastic way to repurpose leftover grilled chicken from a previous BBQ recipe.
How do I adapt this for a smaller campervan kitchen?
This recipe is already perfect for small spaces—no cooking required if you use pre-cooked chicken . Use shelf-stable dressing and store fresh veggies in a cooler or your RV fridge. A meal planner will help you pack the exact ingredients you need, keeping your grocery list short and your food costs optimized.
How do I keep the wrap from getting soggy on the road?
Keep the dressing and croutons separate until you’re ready to eat. Pack the salad mixture and tortillas separately, then assemble at your destination . This is the key to maintaining that satisfying crunch.