Easy Pantry Only RV Bean Chili Skillet Meal with Smoky Grilled Chicken
This post contains affiliate links. As an Amazon Associate, I earn from qualifying purchases.
Hearty Chili Made with Nothing But RV Pantry Staples
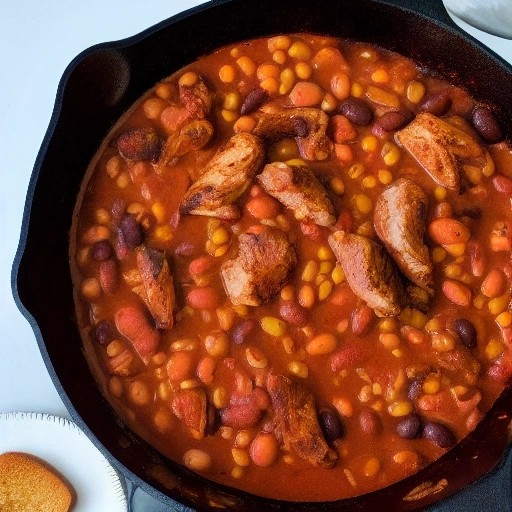
When the weather turns cool or you’re craving something warm and filling, this Easy Pantry Only RV Bean Chili Skillet Meal is exactly what you need. Made entirely from shelf-stable ingredients you already have in your camper, this one pot meal comes together in under 30 minutes.This chili is packed with protein-rich beans, fire-roasted tomatoes, and a blend of smoky spices that deliver big flavor with minimal effort. The secret that takes it over the top? Topping it with perfectly grilled chicken breasts that add a juicy, smoky element and make this simple pantry meal feel like a feast.
Using your gas grill or charcoal grill to cook the chicken adds that irresistible BBQ recipe taste that pairs perfectly with hearty chili. The high heat creates beautiful grill marks while locking in moisture, giving you tender, flavorful chicken every time. It’s beginner-friendly camping cooking at its absolute best.
Recipe Summary
Prep Time: 5 mins
Cook Time: 25 mins
Total Time: 30 mins
Servings: 4-6
Difficulty: Easy
Ingredients
- 2 boneless skinless chicken breasts
- 1 tablespoon olive oil
- 1 teaspoon chili powder
- 1 teaspoon smoked paprika
- ½ teaspoon garlic powder
- Salt and pepper to taste
- 1 tablespoon olive oil (for skillet)
- 1 onion, diced (or 2 tablespoons dried onion flakes)
- 2 cloves garlic, minced (or 1 teaspoon jarred garlic)
- 1 can (15 oz) kidney beans, drained and rinsed
- 1 can (15 oz) black beans, drained and rinsed
- 1 can (15 oz) pinto beans, drained and rinsed
- 1 can (28 oz) crushed or diced tomatoes
- 1 can (4 oz) diced green chilies (optional)
- 2 tablespoons chili powder
- 1 tablespoon ground cumin
- 1 teaspoon smoked paprika
- ½ teaspoon oregano
- Salt and pepper to taste
- Toppings: shredded cheese, sour cream, fresh cilantro, tortilla chips
Instructions
- Preheat the grill: Fire up your gas grill to medium-high heat (400°F). If using a charcoal grill, arrange the coals for even heating and wait until they’re covered with a light ash.
- Season the chicken: Drizzle the chicken breasts with olive oil and coat with chili powder, smoked paprika, garlic powder, salt, and pepper. The smoky flavor from the paprika will complement the grill beautifully.
- Grill the chicken: Place the chicken on the hot grill. Cook for 6-8 minutes per side, flipping once, until the internal temperature reaches 165°F. The chicken should have beautiful grill marks and a slightly crispy exterior. Remove and let rest.
- Start the chili: While the chicken is grilling, heat a large skillet or Dutch oven on your RV stove over medium heat. Add the olive oil and sauté the onion (or dried onion flakes rehydrated with a splash of water) for 3-4 minutes until softened. Add the garlic and cook for 1 minute more.
- Build the chili: Stir in all three cans of beans (drained and rinsed), crushed tomatoes, green chilies (if using), chili powder, cumin, smoked paprika, oregano, salt, and pepper. Bring to a simmer and let it cook for 15 minutes, stirring occasionally, to allow the flavors to meld.
- Serve: Slice or chop the grilled chicken into strips or chunks. Ladle the chili into bowls, top with the grilled chicken, and add your favorite toppings like shredded cheese, sour cream, and fresh cilantro. Serve with tortilla chips on the side.
Tips for the Perfect Grilled Chicken and Chili
- Grill temperature control: For a charcoal grill, create two heat zones—one hot side for searing the chicken and one cooler side for finishing. This prevents burning and ensures even cooking.
- Don’t overcook the chicken: Use a meat thermometer and remove the chicken from the grill at 160°F. It will continue to cook while resting and reach a perfect 165°F.
- Smoky flavor boost: If you’re using a gas grill, try adding a smoker box or aluminum foil packet with soaked wood chips (hickory or mesquite) to infuse extra smokiness into the chicken.
- Adjust chili thickness: If your chili is too thick, add a splash of water or broth. If it’s too thin, let it simmer longer to reduce. This easy pantry only RV bean chili skillet meal is very forgiving.
- Let the chili rest: After cooking, let the chili sit for 5-10 minutes before serving. This allows the flavors to come together even more.
Pantry Swaps for RV Life
This recipe is designed to be flexible with what you have on hand. Here are some easy swaps:
- No fresh onion? Use 2 tablespoons dried onion flakes rehydrated in a little water.
- No fresh garlic? Use 1 teaspoon jarred minced garlic or ½ teaspoon garlic powder.
- Out of one bean variety? Use any canned beans you have—pinto, black, kidney, white beans, or chickpeas all work.
- No crushed tomatoes? Use diced tomatoes or tomato sauce. Adjust the consistency with water if needed.
- Want it meatier? Add a can of drained canned corn or extra beans for more texture.
Delicious Variations
Spicy Chipotle Version
Add 2 chopped chipotle peppers in adobo sauce to the chili for a smoky, spicy kick. Season the chicken with chipotle powder instead of chili powder.
BBQ Chili
Stir ¼ cup of your favorite BBQ sauce into the chili. Baste the chicken with BBQ sauce during the last 2 minutes of grilling for a sweet, tangy flavor.
Vegetarian Version
Skip the chicken altogether—this chili is already packed with protein from the beans. Add extra vegetables like bell peppers, zucchini, or corn for more texture.
Tex-Mex Style
Add a can of fire-roasted tomatoes with green chilies and 1 teaspoon of cumin. Top with crushed tortilla chips, avocado slices, and a squeeze of lime.
White Chicken Chili Variation
Use white beans (cannellini or great northern) and add a can of diced green chilies. Skip the tomatoes and use chicken broth instead. Top with the grilled chicken and fresh cilantro.
Loaded Chili Mac
Add 1 cup of elbow macaroni or small pasta to the chili during the last 10 minutes of cooking. The pasta will cook in the chili, creating a hearty chili mac one pot meal.
Storage Instructions
How to store leftovers: Let the chili cool completely and store it in an airtight container. It will keep in the refrigerator for up to 5 days. Store the grilled chicken separately for best texture.
How to reheat without drying out: Reheat the chili gently on the stovetop over medium-low heat, adding a splash of water or broth if it has thickened. Reheat the chicken slices in a covered skillet with a little broth or microwave on low power to keep it moist.
Freezing: This chili freezes beautifully for up to 3 months. Thaw overnight in the refrigerator and reheat on the stovetop. For best results, freeze the chili without the chicken and grill fresh chicken when serving.
Frequently Asked Questions
Can I use a gas grill instead of a charcoal grill for this recipe?
Absolutely! Both work wonderfully for this easy pantry only RV bean chili skillet meal. A gas grill offers convenience and quick heating, while a charcoal grill provides a more intense smoky flavor. Just preheat to 400°F and follow the same cooking times.
How do I know when the grilled chicken is fully cooked?
Always use an instant-read meat thermometer. Insert it into the thickest part of the breast—it should read 165°F. The chicken should also have clear juices and no pink in the center.
Can I make this chili without a grill?
Yes! You can cook the chicken in the same skillet before starting the chili. Sear it on both sides until cooked through, then remove, chop, and set aside. For a smoky flavor without the grill, add a teaspoon of smoked paprika or a drop of liquid smoke to the chili.
What if I don’t have all three types of beans?
No problem! This is a very flexible recipe. Use whatever canned beans you have in your pantry—kidney, black, pinto, cannellini, or even chickpeas all work great. Two cans are enough if that’s all you have.
How can I make this chili less spicy?
Simply reduce or omit the chili powder and skip the green chilies. Use mild chili powder or paprika instead for color and flavor without the heat. The smoky grilled chicken will still add plenty of flavor.
Can I use canned chicken instead of fresh?
Yes, for an even quicker version, use 2 cans of drained shredded or chunk chicken. Stir it into the chili at the end to heat through. While you won’t get the smoky grilled flavor, it’s a great pantry-only alternative.
This Easy Pantry Only RV Bean Chili Skillet Meal with Smoky Grilled Chicken proves that you can create a hearty, satisfying dinner using nothing but what’s already in your camper pantry. The grilled chicken adds that special touch—smoky, juicy, and full of flavor—that elevates simple canned ingredients into something truly memorable. Whether you’re at a campsite, a rest stop, or parked in your driveway, this one pot meal is ready in 30 minutes and will warm you from the inside out. Fire up that gas grill or charcoal grill, open your pantry, and enjoy the best of simple RV cooking. Happy travels and happy eating!