Budget RV Macaroni and Beef Skillet: A Grilled Camping Classic
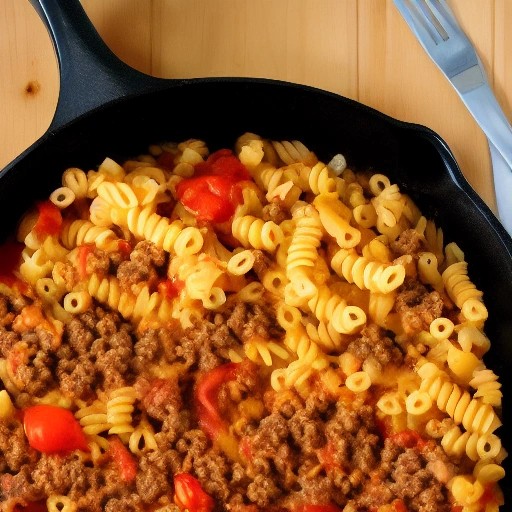
When you’re living the RV life, every dollar counts—and every meal needs to be satisfying, filling, and easy to clean up. This Budget RV Macaroni and Beef Skillet checks all those boxes and more. It’s a hearty, comforting one-pan meal that brings all the nostalgia of your favorite stovetop macaroni and beef, but with a delicious smoky twist that only comes from cooking over an open flame.
This recipe is designed specifically for life on the road. It uses affordable, shelf-stable ingredients that are easy to store in your RV pantry, and everything cooks in a single skillet over your grill or campfire. The direct heat adds a subtle smokiness to the ground beef and pasta that transforms a humble budget meal into something truly special. Plus, it’s beginner-friendly, comes together in about 25 minutes, and requires minimal cleanup—perfect after a long day of exploring the open road.
Recipe Summary
Prep Time: 5 mins
Cook Time: 20 mins
Total Time: 25 mins
Servings: 4
Difficulty: Easy
Ingredients
- 1 pound ground beef (80/20 recommended)
- 2 cups elbow macaroni or small shell pasta (uncooked)
- 1 medium onion, diced
- 2 cloves garlic, minced
- 1 can (14.5 ounces) diced tomatoes, undrained
- 2 cups beef or chicken broth
- 1 cup milk (or water for dairy-free)
- 1 tablespoon chili powder
- 1 teaspoon smoked paprika (for smoky flavor)
- 1 teaspoon garlic powder
- 1 teaspoon onion powder
- ½ teaspoon dried oregano
- Salt and black pepper to taste
- 1½ cups shredded cheddar cheese (optional, for cheesy version)
- Fresh parsley for garnish (optional)
Step-by-Step Instructions for Budget RV Macaroni and Beef Skillet
- Preheat your grill. If using a gas grill, preheat to medium heat (around 375-400°F). For a charcoal grill, arrange the coals for direct heat. You should be able to hold your hand about 6 inches above the grate for 4-5 seconds. This steady heat is perfect for simmering the pasta.
- Heat your skillet. Place a large cast-iron skillet or deep heavy-bottomed pan on the grill grate. Let it heat up for about a minute.
- Brown the beef. Add the ground beef to the hot skillet. Break it apart with a spatula and cook for 5-6 minutes until it’s browned and no longer pink. The high heat from the grill creates a beautiful caramelized crust on the meat, giving it that authentic smoky flavor that makes this dish so special.
- Sauté the aromatics. Add the diced onion to the skillet with the beef and cook for 3-4 minutes until soft and translucent. Add the minced garlic and cook for another minute until fragrant.
- Add the pasta and seasonings. Stir in the uncooked pasta, chili powder, smoked paprika, garlic powder, onion powder, oregano, salt, and pepper. Cook for 1 minute to toast the spices and pasta slightly.
- Add the liquids. Pour in the broth, milk, and diced tomatoes (with their juices). Stir everything together until well combined.
- Simmer on the grill. Bring the mixture to a gentle simmer. Cover the skillet with a lid or aluminum foil and move it to a slightly cooler area of the grill (indirect heat) or reduce the burner knobs on your gas grill to low. Let it cook for 12-15 minutes, stirring occasionally, until the pasta is tender and has absorbed most of the liquid.
- Add the cheese (optional). If using cheese, stir in the shredded cheddar during the last 2 minutes of cooking. Mix until it’s completely melted and the sauce becomes rich and creamy.
- Serve. Remove the skillet from the grill. Garnish with fresh parsley if desired. Serve hot and enjoy this budget-friendly camping classic with that incredible grilled twist!
Tips for the Best Budget RV Macaroni and Beef Skillet
- Perfect Pasta Texture: The key to perfect pasta in a skillet is the right liquid-to-pasta ratio and proper heat management. Once you add the liquids and bring it to a simmer, move the skillet to indirect heat and cover it tightly. Resist the urge to lift the lid and peek—this lets the steam escape and can result in undercooked pasta.
- Stretch the Budget Further: This recipe is already budget-friendly, but you can stretch it even more by adding a can of drained corn, black beans, or extra vegetables. It adds volume, nutrition, and extra flavor without costing much.
- Get That Smoky Flavor: For an even more intense smoky taste, add a smoker box with wood chips (hickory or mesquite) to your gas grill. On a charcoal grill, the flavor is already built in. The smoked paprika also adds a lovely smoky undertone.
- Heat Management: On a charcoal grill, set up a two-zone fire. Start the skillet over direct heat for browning, then move to indirect heat for simmering. On a gas grill, simply reduce the burner knobs to low once you’ve added the liquids.
- Cheese Matters: If you’re adding cheese, freshly shredded cheese melts much better than pre-shredded (which often contains anti-caking agents). If you can, grate your own cheese for the creamiest sauce.
Delicious Variations to Try
- Spicy Version: Add a diced jalapeño with the onions and use hot chili powder. Stir in a few dashes of hot sauce or cayenne pepper for an extra fiery kick.
- BBQ Version: Replace the chili powder with your favorite BBQ recipe rub. Stir in ¼ cup of BBQ sauce when you add the liquids for a sweet and tangy flavor.
- Veggie-Packed Version: Add diced bell peppers, mushrooms, or zucchini to the skillet with the onions. This is a great way to use up fresh produce and add extra nutrition to your camp meal.
- Smoky Sausage Version: Use smoked sausage or kielbasa instead of ground beef (or use half beef, half sausage). Slice it thinly and brown it in the skillet before adding the onions. The smoky sausage adds incredible depth.
- Loaded Version: Top the finished skillet with crispy bacon bits, sour cream, and green onions for a loaded baked potato-inspired twist.
Storage and Reheating Instructions
To Store (at camp): Let the skillet mixture cool completely before transferring to an airtight container. Store in a cooler with ice packs for up to 3 days. Note that the sauce may thicken upon cooling.
To Reheat (at camp): The best way to reheat this dish is to return it to your skillet over low heat on the grill or campfire. Add a splash of broth or milk to bring back the creamy texture and stir frequently until heated through. You can also reheat individual portions in a foil packet over the coals.
At Home: Store leftovers in the refrigerator for up to 4 days. Reheat in a non-stick skillet over medium heat, adding a little liquid to prevent drying out. Freeze for up to 3 months for future camping trips.
Frequently Asked Questions (FAQ)
Can I make this macaroni and beef skillet on a gas grill?
Absolutely! A gas grill is ideal for this recipe. Its precise temperature control makes it easy to manage the two-stage cooking process—browning over direct heat and simmering over indirect heat. Just preheat to medium and follow the instructions as written.
What if I don’t have a skillet for camping?
A cast-iron skillet is ideal, but if you don’t have one, you can use a heavy-duty aluminum foil pan or a Dutch oven. Just be careful with thin pans as they can warp over high heat. For the most authentic camping experience, invest in a good cast-iron skillet—it’ll last you a lifetime of outdoor cooking.
Can I use water instead of milk?
You can use water, but the sauce won’t be as creamy. For a dairy-free version, use unsweetened oat milk, almond milk, or coconut milk. The coconut milk adds a lovely richness that complements the smoky flavors beautifully.
How do I prevent the pasta from burning on the bottom?
The key to preventing burnt pasta is proper heat management. Once you add the liquids and cover the skillet, move it to indirect heat—away from the direct flames or coals. Also, stir the mixture occasionally to prevent sticking. The grill’s even heat, when managed correctly, will cook the pasta perfectly.
Can I prepare this ahead of time for camping?
Absolutely! You can fully cook this dish at home, cool it, and pack it in your RV fridge or cooler. When you’re ready to eat at camp, just reheat it in your skillet over the grill or campfire. This is a fantastic make-ahead option that saves time and fuel at the campsite.
Can I double this recipe for a crowd?
Yes! This recipe doubles easily. Just make sure you have a large enough skillet (at least 14 inches) to accommodate the extra volume. You may need to increase the cooking time slightly, and be sure to stir more frequently to prevent sticking.