Omnia Oven Garlic Herb Turkey Breast – A Juicy Campground Showstopper
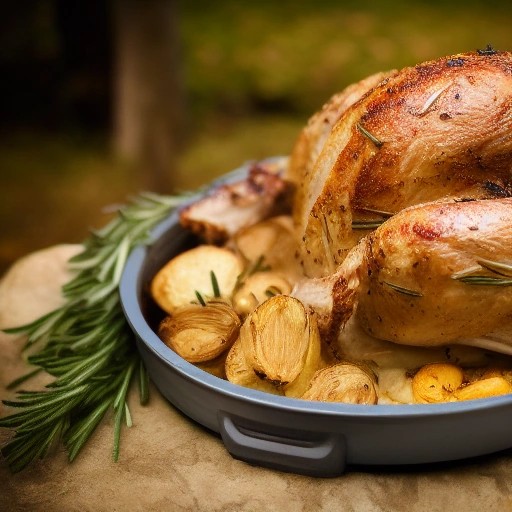
Imagine carving into a perfectly golden, juicy turkey breast infused with aromatic garlic and fresh herbs, all while sitting at your campsite. This Omnia Oven Garlic Herb Turkey Breast recipe proves you don’t need a full-sized kitchen to create a show-stopping meal. It’s the perfect centerpiece for a special outdoor dinner, holiday on the road, or just because you’re craving something deliciously comforting.
This recipe is designed specifically for RV and camping life, using your Omnia stovetop oven to roast a turkey breast that’s tender, flavorful, and has that irresistible crispy skin. The garlic herb butter creates a rich, savory crust while keeping the meat incredibly moist. It’s a fantastic way to impress your fellow campers and make the most of your propane stove, all without the need for a traditional oven. Plus, cooking a smaller turkey breast is a smart way to manage your food portions and RV refrigerator space for other trip essentials.
Recipe Card
Recipe Summary
Prep Time: 20 mins
Cook Time: 1 hr 15 mins (approx.)
Total Time: 1 hr 35 mins
Servings: 4-6
Difficulty: Easy
Ingredients
- 2.5 – 3 lb boneless, skin-on turkey breast
- ½ cup (1 stick) unsalted butter, softened
- 4 cloves garlic, minced
- 1 tbsp fresh rosemary, finely chopped
- 1 tbsp fresh thyme leaves
- 1 tbsp fresh sage, finely chopped (optional)
- 1 tsp salt
- ½ tsp black pepper
- Zest of 1 lemon (optional)
- 1 tbsp olive oil
Instructions
- Make the Garlic Herb Butter: In a small bowl, mix the softened butter, minced garlic, chopped rosemary, thyme, sage (if using), salt, pepper, and lemon zest until well combined. This flavorful butter is the secret to a moist and delicious turkey.
- Preheat Your Omnia Oven: Place your Omnia stovetop oven on your RV’s propane stove over medium heat. The Omnia is designed to work best on gas burners and should be preheated for a few minutes before adding food. You’re aiming for a gentle, consistent heat inside the oven, around 350°F (175°C) if you have a thermometer, but low to medium heat is key to avoid burning.
- Prepare the Turkey Breast: Pat the turkey breast completely dry with paper towels. This is an important step for getting crispy skin. Gently loosen the skin from the meat by sliding your fingers between them, being careful not to tear the skin.
- Season and Butter the Turkey: Spread about half of the garlic herb butter directly onto the meat under the skin, covering as much surface as possible. Rub the remaining butter evenly over the outside of the skin. This will help create a beautiful, golden-brown crust.
- Sear for Extra Flavor (Optional): For an even more flavorful crust, heat the olive oil in a skillet over medium-high heat and sear the turkey breast on all sides until golden brown before placing it in the Omnia oven. This step is optional but highly recommended.
- Bake in the Omnia: Place the prepared turkey breast in the Omnia oven’s baking insert. You can add a splash of water or chicken broth to the bottom of the pan to create steam and keep the turkey extra moist. Cover with the lid. Place the Omnia oven over the heat and bake for approximately 1 hour to 1 hour 15 minutes. The total time will depend on the size of your turkey breast.
- Check for Doneness: The turkey is ready when it reaches an internal temperature of 165°F (74°C) in the thickest part, measured with a meat thermometer. This is the most reliable way to ensure perfectly cooked, juicy meat.
- Rest and Carve: Carefully remove the Omnia oven from the heat. Let the turkey breast rest for 15-20 minutes before carving. This allows the juices to redistribute throughout the meat, keeping it moist and tender. Slice against the grain and serve.
Tips Section
- Choosing Your Turkey: A boneless, skin-on turkey breast is ideal for the Omnia oven. It’s smaller than a whole bird and fits perfectly in the baking insert. Check your fridge capacity before you shop to ensure you have enough refrigerator space to store it until cooking time.
- Controlling Heat on the Stove: The Omnia oven works best with consistent, moderate heat. If you notice the bottom is browning too fast, reduce the flame to low. Remember that the air circulates up through the center hole and is directed over the top by the lid, providing both bottom and top heat. Low and slow is the key to perfect stovetop baking.
- Using a Meat Thermometer: A meat thermometer is your best friend for this recipe. Turkey can dry out quickly if overcooked. Remove it from the heat the moment it hits 165°F for a perfectly juicy result.
- Boosting Smoky Flavor: While you’re cooking on a propane stove, you can still add a hint of smoke. Try adding a pinch of smoked paprika to the garlic herb butter or use a small amount of liquid smoke in the pan juices for a subtle smoky flavor that rivals a charcoal grill.
- Smart Food Planning: This dish is excellent for meal planning. It provides delicious leftovers for sandwiches, salads, or tacos the next day, helping you stretch your food budget and minimize food waste during your trip.
Variations
- Citrus Herb Version: Add the zest of an orange or grapefruit to the herb butter along with the lemon. The bright, citrusy notes pair beautifully with the savory herbs.
- Spicy Cajun Version: Replace the herbs with 1½ tablespoons of Cajun seasoning and a teaspoon of smoked paprika. This gives the turkey a bold, Southern kick that’s perfect for those who love heat.
- Maple Glazed Version: Brush the turkey with a mixture of maple syrup and Dijon mustard during the last 15 minutes of baking for a sweet and tangy glaze.
- Garlic and Honey Version: Mix 2 tablespoons of honey into the garlic herb butter for a touch of sweetness that caramelizes beautifully on the skin.
- Dutch Oven Alternative: If you don’t have an Omnia oven, you can make this recipe in a Dutch oven over a charcoal or gas grill. Cook over indirect heat with coals on the lid for an even oven-like environment.
Storage Instructions
- How to Store Leftovers: Let the turkey cool completely. Store slices or chunks in an airtight container in your RV refrigerator for up to 3 days. This is a great way to practice food storage and have ready-to-eat protein for quick meals.
- Reheating Without Drying: The best way to reheat leftover turkey is gently. Place slices in a skillet with a little broth or water, cover, and heat over low until warmed through. You can also microwave individual portions covered with a damp paper towel to prevent drying out. The meat is also delicious cold in salads or sandwiches.
FAQ Section
Can I cook a whole turkey in the Omnia oven?
No, the Omnia oven’s baking insert is too small for a whole turkey. However, it’s perfectly sized for a boneless or small bone-in turkey breast, making it an excellent tool for RVers who want a classic roast without a full-size bird.
How do I know when the turkey is done without a meat thermometer?
While a meat thermometer is highly recommended for the most accurate results, you can check by piercing the thickest part of the breast with a knife. The juices should run clear, not pink. However, for guaranteed safety and moisture, a thermometer is your best option.
Can I use dried herbs instead of fresh?
Yes, you can substitute dried herbs. A good rule of thumb is to use about one-third the amount of dried herbs as fresh. For example, if a recipe calls for 1 tablespoon of fresh thyme, use 1 teaspoon of dried thyme.
What if my turkey skin is browning too quickly?
If the skin is getting too dark before the inside is cooked, simply tent the top loosely with a piece of aluminum foil. This will shield the skin from direct heat while allowing the meat to continue cooking through.
How should I plan the cooking time for a larger turkey breast?
As a general guideline, roast a turkey breast for about 20 minutes per pound at 350°F. A 3-pound breast will take roughly 1 hour, while a 5-pound breast might need about 1 hour 40 minutes. Always rely on the internal temperature reaching 165°F to confirm it’s done. This is a great tip to remember when planning your trip meals and using your food planner.