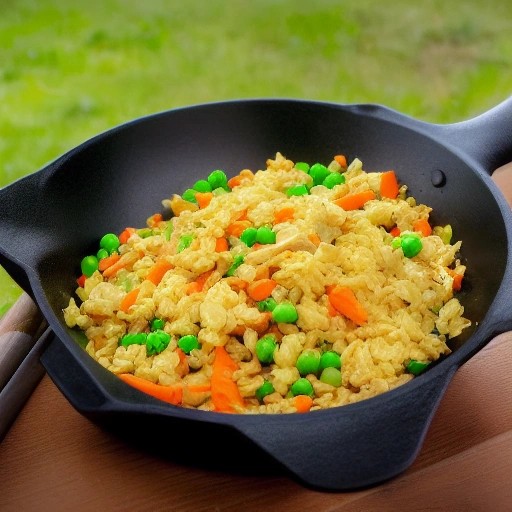
Easy Quick RV Chicken Fried Rice Bowl: A Smoky One-Pan Campground Favorite
There’s something magical about firing up the grill at your campsite and turning simple ingredients into a meal that tastes like it came from a trendy food truck. This Easy Quick RV Chicken Fried Rice Bowl does exactly that—it takes the classic comfort of fried rice and elevates it with smoky, juicy grilled chicken that adds incredible depth to every bite.
Perfect for those nights when you want something satisfying but don’t want to spend hours over the stove, this recipe is a game-changer for your RV kitchen. It’s a fantastic way to use up leftover rice and grilled chicken, making it both budget-friendly and delicious. The best part? It all comes together in one pan, which means less cleanup and more time enjoying the great outdoors.
1. Introduction
This Easy Quick RV Chicken Fried Rice Bowl is the ultimate campground one-pan meal, combining smoky grilled chicken with classic fried rice flavors for a dinner that’s ready in under 30 minutes. It’s a beginner-friendly recipe that transforms simple pantry staples into a restaurant-quality dish that will impress your whole crew.
The secret to this dish is using grilled chicken that’s been kissed by the flames of your gas grill or charcoal grill. That smoky flavor infuses every grain of rice, creating a taste that’s anything but ordinary. Whether you’re a seasoned BBQ enthusiast or just getting started with outdoor cooking, this recipe proves that delicious food doesn’t have to be complicated.
2. Recipe Card
Recipe Summary
Prep Time: 10 mins
Cook Time: 15 mins
Total Time: 25 mins
Servings: 4
Difficulty: Easy
Ingredients
- 2 cups cooked grilled chicken, diced (see note below)
- 3 cups cooked and chilled white or brown rice (day-old rice works best)
- 2 tablespoons vegetable or canola oil
- 1 small onion, finely diced
- 2 cloves garlic, minced
- 1 cup frozen peas and carrots mix
- 2 large eggs, lightly beaten
- 3 tablespoons low-sodium soy sauce
- 1 tablespoon oyster sauce (optional)
- 1 teaspoon sesame oil
- 2 green onions, sliced (for garnish)
- Salt and black pepper to taste
Note: If you don’t have pre-cooked grilled chicken, season 2 boneless, skinless chicken breasts with salt, pepper, and a little garlic powder. Fire up your charcoal grill or gas grill to medium heat (about 375-400°F) and grill for 6-8 minutes per side, or until the internal temperature reaches 165°F. Let it rest before dicing.
3. Instructions (Step-by-step)
Step 1: Prep Your Grill and Chicken
If you’re grilling chicken specifically for this recipe, start by preheating your grill. For a charcoal grill, arrange the coals for medium heat. For a gas grill, preheat to medium. Grill your chicken until cooked through, then set aside to rest before dicing.
Step 2: Heat Your Pan
Place a large skillet or wok over medium-high heat on your RV stove. Add the vegetable oil and let it get nice and hot.
Step 3: Sauté Aromatics
Add the diced onion to the hot pan and cook until translucent, about 2-3 minutes. Add the minced garlic and cook for another minute until fragrant.
Step 4: Add Vegetables
Toss in the frozen peas and carrots. Cook for 2-3 minutes until they’re heated through and slightly tender.
Step 5: Scramble the Eggs
Push the vegetables to one side of the pan. Pour the beaten eggs into the empty side and scramble them until fully cooked. Then mix everything together.
Step 6: Add the Rice
Add the chilled rice to the pan. Break up any clumps and stir-fry for 2-3 minutes until the rice is hot and slightly crispy.
Step 7: Add the Smoked Chicken and Sauces
Stir in your diced grilled chicken, soy sauce, oyster sauce (if using), and sesame oil. Cook for another 2-3 minutes until everything is well combined and heated through. The smoky flavor from your grilled chicken will start to shine here.
Step 8: Garnish and Serve
Season with salt and pepper to taste. Garnish with sliced green onions and serve hot.
4. Tips Section
- Avoiding Dry Chicken: Since you’re using pre-cooked grilled chicken, add it at the end just to warm through. Overcooking will make it tough. Dice it into bite-sized pieces for even heating.
- Getting Perfect Fried Rice Texture: Use day-old rice that’s been chilled in your RV fridge. Fresh rice is too moist and will make your fried rice mushy. Chilled rice also helps you utilize your refrigerator space efficiently when meal planning.
- Heat Control: Fried rice needs high heat to get that delicious, slightly charred flavor. If your RV stove doesn’t get very hot, cook in smaller batches to avoid steaming the rice.
- Grill Flavor Boost: For an extra layer of smoky flavor, you can even grill the onion and garlic in a small foil packet on your charcoal grill before adding them to the rice.
- Marinade Timing: For maximum BBQ recipe flavor, marinate your chicken in soy sauce, ginger, and garlic for at least 30 minutes before grilling. This adds incredible depth and helps keep the meat juicy.
5. Variations
- Spicy Version: Add 1-2 teaspoons of sriracha or chili garlic sauce along with the soy sauce. Top with fresh sliced Thai bird chilies for an extra kick.
- BBQ Sauce Version: Swap the soy sauce for your favorite BBQ sauce and add a drizzle of honey. This creates a sweet and smoky flavor profile that’s irresistible.
- Healthy Version: Use brown rice and load up on extra vegetables like bell peppers, broccoli, or snap peas. You can also use cauliflower rice for a low-carb option.
- Smoky Version: Add a teaspoon of smoked paprika to the rice and use smoked chicken. Consider using a smoker instead of a grill for the chicken to get an even deeper smoky flavor.
- Teriyaki Version: Use teriyaki sauce instead of soy sauce and add grilled pineapple chunks. Top with toasted sesame seeds and cilantro for an Asian-inspired flavor explosion.
- Budget-Friendly Version: Stretch your food budget by adding more rice and vegetables. This is a great way to make your grocery budget go further while camping.
6. Storage Instructions
- How to Store Leftovers: Allow the fried rice to cool completely before transferring to an airtight container. Store in your camper fridge for up to 4 days. Proper food storage is essential for maintaining food safety on the road.
- Reheating Without Drying: To reheat, use a skillet over medium heat with a splash of water or soy sauce. Stir frequently until heated through. For microwave reheating, cover with a damp paper towel to retain moisture.
- Freezing Option: This fried rice freezes well for up to 3 months. Portion into individual servings before freezing. Thaw in the RV fridge overnight before reheating.
7. FAQ Section
Q: Can I use freshly cooked rice for this recipe?
Yes, but it’s best to spread freshly cooked rice on a baking sheet and let it cool in your RV fridge for at least an hour. This removes excess moisture and prevents soggy fried rice. Day-old rice is still the best option for perfect texture.
Q: How long should I grill the chicken?
Grill boneless, skinless chicken breasts over medium heat (350-375°F) for 6-8 minutes per side. The internal temperature should reach 165°F. For even more flavor, use a charcoal grill with wood chips for that authentic smoky taste.
Q: Can I make this vegetarian?
Absolutely! Simply skip the chicken and add extra vegetables like mushrooms, bell peppers, or edamame. You can also add grilled tofu for protein. The smoky flavor can come from a dash of liquid smoke.
Q: How do I keep my fried rice from sticking to the pan?
Make sure your pan is hot before adding oil and rice. Use enough oil to coat the pan, and don’t overcrowd the pan. If you’re cooking a large batch, work in smaller portions.
Q: What’s the best way to heat the fried rice while camping?
A large skillet or cast iron pan over your RV stove works best for even heating. If you’re boondocking and concerned about propane usage, consider using a portable propane stove to conserve your motorhome propane for other appliances like your water heater and propane fridge.
Q: Can I add other proteins to this dish?
Yes! Shrimp, pork, or diced ham all work wonderfully. Just make sure any additional protein is pre-cooked before adding to the fried rice.