Easy Campfire Cheeseburger Macaroni – A One-Pot Crowd-Pleasing Classic
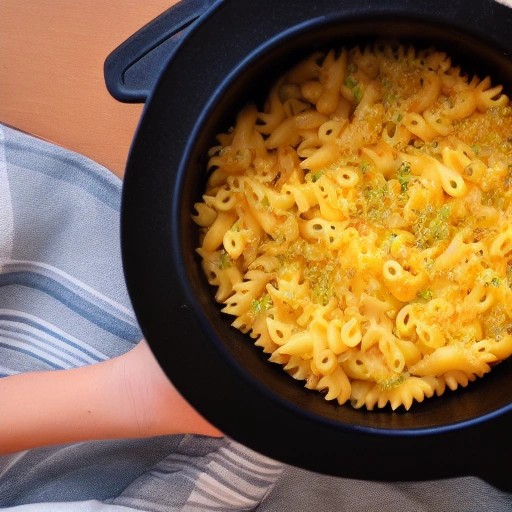
Imagine all the comforting, cheesy goodness of your favorite stovetop macaroni and cheese, combined with juicy seasoned ground beef and classic burger flavors, all cooked in a single pot over an open campfire. This Easy Campfire Cheeseburger Macaroni is the ultimate one-pot meal for outdoor enthusiasts – it’s hearty, incredibly satisfying, and guaranteed to bring smiles around the campfire.
This recipe is designed for camp cooking at its most convenient and delicious. Using a cast-iron Dutch oven or deep skillet over your campfire or grill, you can create a creamy, cheesy pasta dish that tastes like a cross between a backyard BBQ burger and a comforting bowl of mac and cheese. It’s a fantastic way to feed a hungry crowd without spending hours in the kitchen, and it’s gentle on your food budget too. Plus, it’s a great example of how a few simple ingredients can create something truly spectacular while keeping your RV kitchen supplies to a minimum.
Recipe Card
Recipe Summary
Prep Time: 15 mins
Cook Time: 25-30 mins
Total Time: 40-45 mins
Servings: 6-8
Difficulty: Easy
Ingredients
- 1 lb ground beef
- 1 small onion, diced
- 2 cloves garlic, minced
- 2 cups elbow macaroni pasta (uncooked)
- 3 cups beef or chicken broth
- 1 (14.5 oz) can diced tomatoes, undrained
- 1 tbsp Worcestershire sauce
- 1 tsp mustard powder
- 1 tsp smoked paprika
- ½ tsp salt
- ¼ tsp black pepper
- 2 cups shredded cheddar cheese
- ½ cup milk or heavy cream
- Fresh parsley for garnish (optional)
Instructions
- Prepare Your Campfire or Grill: Build a campfire and let it burn down to a bed of hot coals. If using a charcoal grill, light your briquettes and wait until they’re covered with white ash. For a gas grill, preheat to medium-high heat (about 400°F).
- Brown the Ground Beef: Place a cast-iron Dutch oven or deep skillet on the grill grate or directly over the coals. Add the ground beef, onion, and garlic. Cook until the beef is browned and crumbled, and the onion is softened, about 5-7 minutes. Drain any excess grease.
- Add the Pasta and Liquids: Stir in the uncooked elbow macaroni, beef broth, diced tomatoes (with their juices), Worcestershire sauce, mustard powder, smoked paprika, salt, and pepper. Bring the mixture to a simmer.
- Cook the Pasta: Cover the Dutch oven with its lid (or cover the skillet with foil) and let it simmer for about 12-15 minutes, stirring occasionally, until the pasta is tender and has absorbed most of the liquid. If using a Dutch oven over a campfire, arrange about 8-10 coals on the bottom and 12-15 on the lid for even cooking.
- Add the Cheese and Cream: Once the pasta is cooked, reduce the heat to low. Stir in the milk or cream and 1½ cups of the shredded cheddar cheese. Stir continuously until the cheese is completely melted and the sauce is creamy and smooth.
- Top and Melt: Sprinkle the remaining ½ cup of cheddar cheese over the top. Cover and let it sit for 2-3 minutes off the heat until the cheese is melted and bubbly.
- Serve: Remove from heat, garnish with fresh parsley if desired, and serve directly from the pot. This dish is perfect on its own or with a side salad for a complete meal.
Tips Section
- Getting Perfect Pasta: The key to perfectly cooked pasta in one pot is using the right amount of liquid and not overcooking it. Start checking the pasta at the 10-minute mark – it should be al dente with just a little bite. The pasta will continue to absorb liquid as it sits.
- Choosing the Right Pot: A cast-iron Dutch oven works best for this recipe because it distributes heat evenly and retains heat well. If using a skillet, make sure it’s deep enough to hold all the ingredients without overflowing.
- Controlling Heat on the Campfire: When cooking over a campfire, heat can be unpredictable. If you notice the pasta is cooking too fast or the bottom is burning, move the pot to a cooler part of the fire or reduce the number of coals underneath. Practice makes perfect with campfire cooking.
- Adding Smoky Flavor: For an extra layer of smoky flavor, try adding a handful of soaked wood chips to your charcoal grill. Hickory or mesquite chips work beautifully with beef, giving the dish that authentic BBQ recipe taste.
- Using Your RV Fridge Space: This recipe uses mostly shelf-stable ingredients like pasta and canned tomatoes, which saves valuable refrigerator space for perishables like cheese and milk. This is a smart way to maximize your fridge capacity and food storage during your trip.
Variations
- Bacon Cheeseburger Version: Cook 4-6 slices of chopped bacon until crispy before adding the ground beef. Stir the crispy bacon into the macaroni along with the cheese for an extra layer of smoky, savory flavor.
- Spicy Jalapeño Version: Add 1-2 diced jalapeños (seeds removed for less heat) when you add the onion. Use pepper jack cheese instead of cheddar for a spicy kick. This version is perfect for those who love heat.
- Loaded Baked Potato Version: Add ½ cup of sour cream and ¼ cup of chopped green onions when you add the cheese. Garnish with additional green onions and crispy bacon for a loaded baked potato twist.
- Veggie-Packed Version: Add 1 cup of diced bell peppers, mushrooms, or zucchini when you brown the beef. This increases the nutritional value and stretches the meal further, which is great for your food budget.
- BBQ Cheeseburger Version: Replace the Worcestershire sauce and mustard powder with ¼ cup of your favorite BBQ sauce. This gives the dish a tangy, sweet barbecue flavor that pairs perfectly with the beef and cheese.
Storage Instructions
- How to Store Leftovers: Allow the cheeseburger macaroni to cool completely. Store leftovers in an airtight container in your RV refrigerator for up to 3 days. This is a great way to practice food storage and have a quick meal ready for the next day.
- Reheating Without Drying: The best way to reheat this dish is in a skillet over low heat, adding a splash of milk or broth to revive the creamy sauce. You can also microwave individual portions, but cover them with a damp paper towel to prevent drying out. For extra creaminess, add a little extra cheese when reheating.
FAQ Section
Can I use a different type of pasta?
Yes! Any short pasta shape will work – shells, rotini, cavatappi, or penne are all great options. Just adjust the cooking time according to the package instructions, checking the pasta for doneness a few minutes before the recommended time.
What if I don’t have a Dutch oven?
You can use any large, deep skillet or pot that’s suitable for campfire cooking. Just make sure it has a lid or can be covered with foil. Cast-iron is ideal, but a heavy-bottomed stainless steel pot also works well. A disposable aluminum pan is also an option for easy cleanup.
Can I make this recipe on a gas grill instead of a campfire?
Absolutely! A gas grill works perfectly for this recipe. Preheat the grill to medium-high heat (about 400°F). Place your Dutch oven or skillet on the grill grate, close the lid, and follow the same cooking instructions. The enclosed heat will cook everything perfectly.
Can I add more vegetables to this dish?
Definitely! This recipe is very versatile. Bell peppers, mushrooms, zucchini, and even corn all work well. Just add them when you add the onion so they have time to cook through. This is a great way to use up any vegetables you have on hand and practice your meal planning while reducing food waste.
How can I make this recipe more budget-friendly?
This recipe is already very budget-friendly! To stretch it even further, you can use a little less meat and add more pasta or extra vegetables. Using store-brand ingredients for the broth, tomatoes, and cheese can also save money. This dish is perfect for feeding a crowd without breaking your food budget, and it’s a great way to use up items from your camping pantry.